
Setting Up Traefik on the Core Pi


In this post, I’ll walk you through setting up Traefik as a reverse proxy using Cloudflare as your DNS provider. I’ll explain why Cloudflare is an ideal choice when dealing with dynamic IP addresses and how to configure it without needing to register your domain with them. The guide covers creating a secure Cloudflare API token with limited permissions, setting up wildcard DNS records, and securely storing credentials using Docker secrets.
We’ll then dive into the Docker Compose configuration needed to deploy Traefik, along with a docker-socket-proxy for enhanced security, preventing direct access to the Docker socket. After that, I’ll show you how to configure Traefik with both static and dynamic configuration files, enabling automatic HTTPS with DNS challenges.
By the end of this post, you’ll have a fully operational Traefik setup with Cloudflare-managed DNS, HTTPS support, and a dashboard for monitoring—all configured with security and flexibility in mind.
Structure
config: {
  dynamic.yml: null,
  traefik.yml: null
},
secrets: {
  cf_api_key: null,
  cf_api_email: null
},
docker-compose.yml: null
Normally, I would use Namecheap, but their API requires setting allowed IPs. Since I’m behind a dynamic IP, I can't use Namecheap as my DNS provider. So, I’ll be using Cloudflare instead.
If you'd like to use a different DNS provider, these are the current providers supported by Traefik.
Ensure you’ve selected the correct version in the bottom of the side navigation.
Setting Up Cloudflare as the DNS Provider
You can set up Cloudflare to be your DNS provider even if your domain isn't registered with them. Just change the nameservers to point to Cloudflare, and you can manage your DNS records there.
If you're not sure how to do this, log in to Cloudflare, enter your domain name, and they’ll guide you through the process.
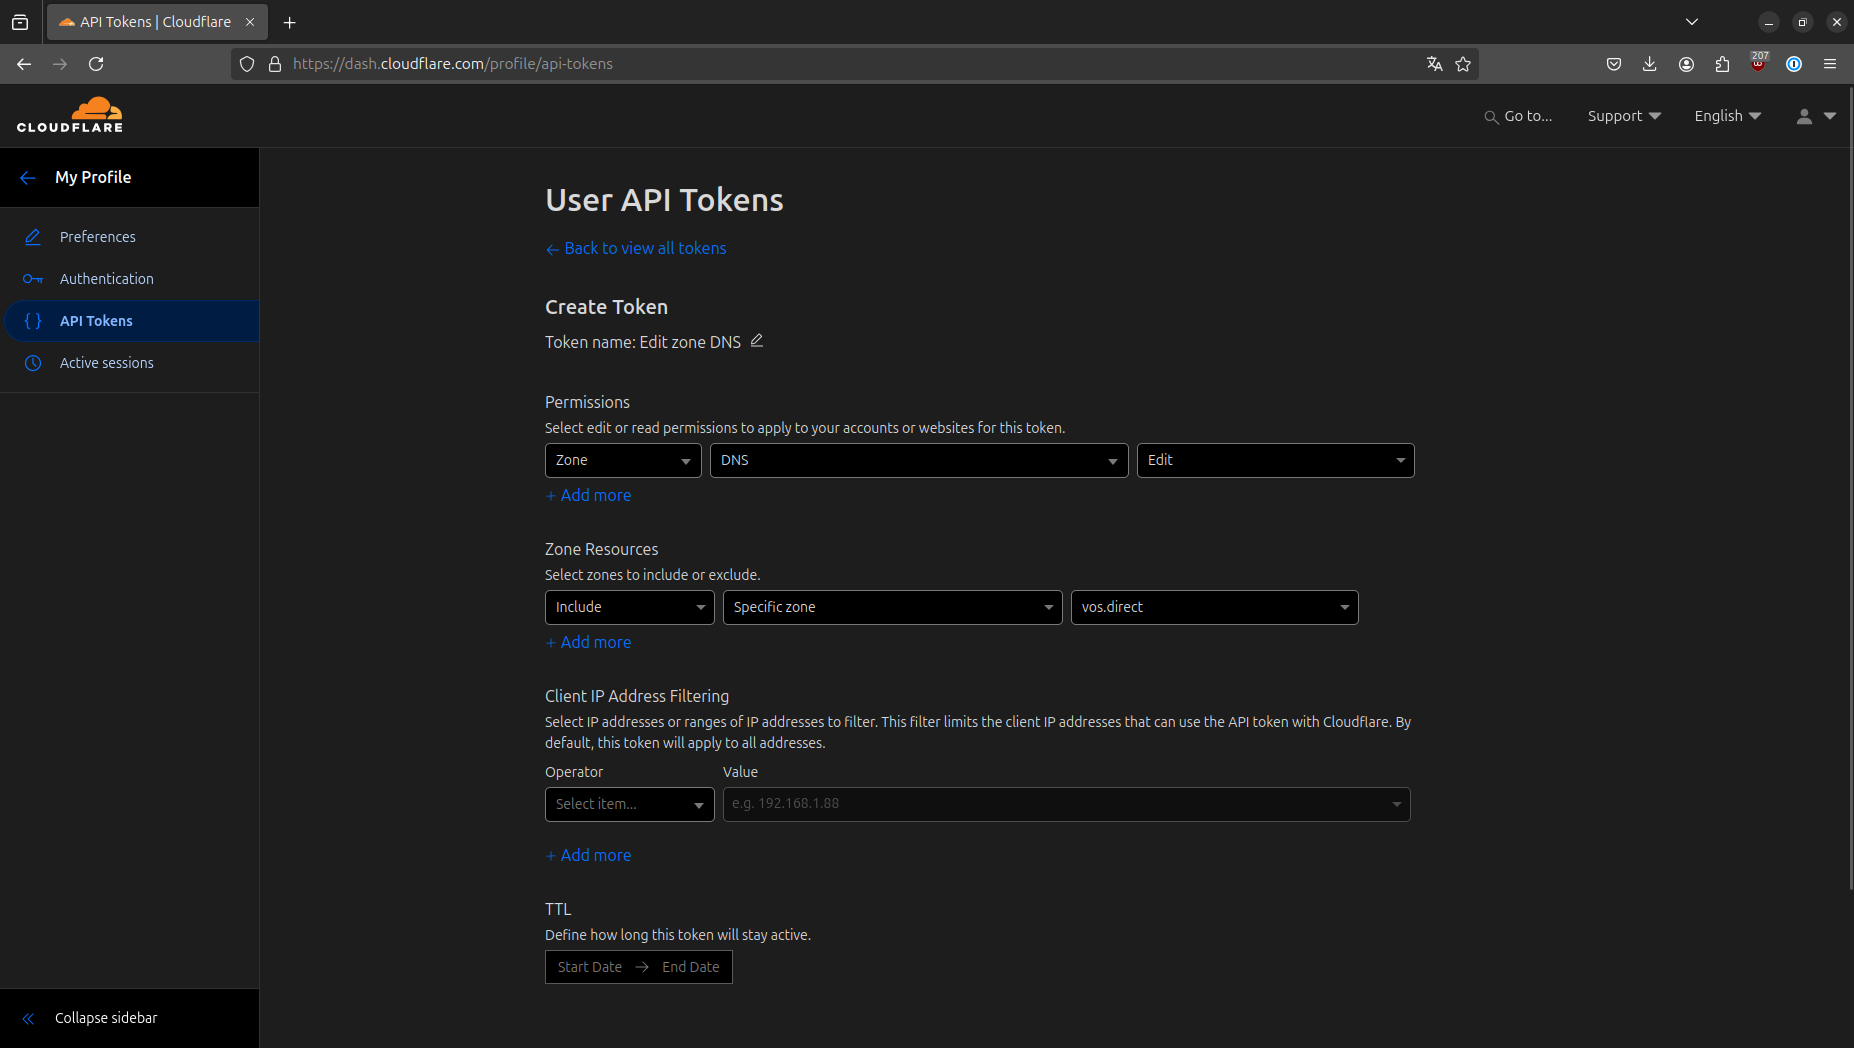
Creating a Least-Privilege Cloudflare API Token
According to the Traefik docs, we could provide a Global API key to Traefik. However, I prefer the least privilege principle, so I’ll create a new API token with minimal permissions.
To create this token in Cloudflare:
- Use the
Edit zone DNStemplate. - Select the permissions you want to grant the token.
- Specify the zones the token should work with.
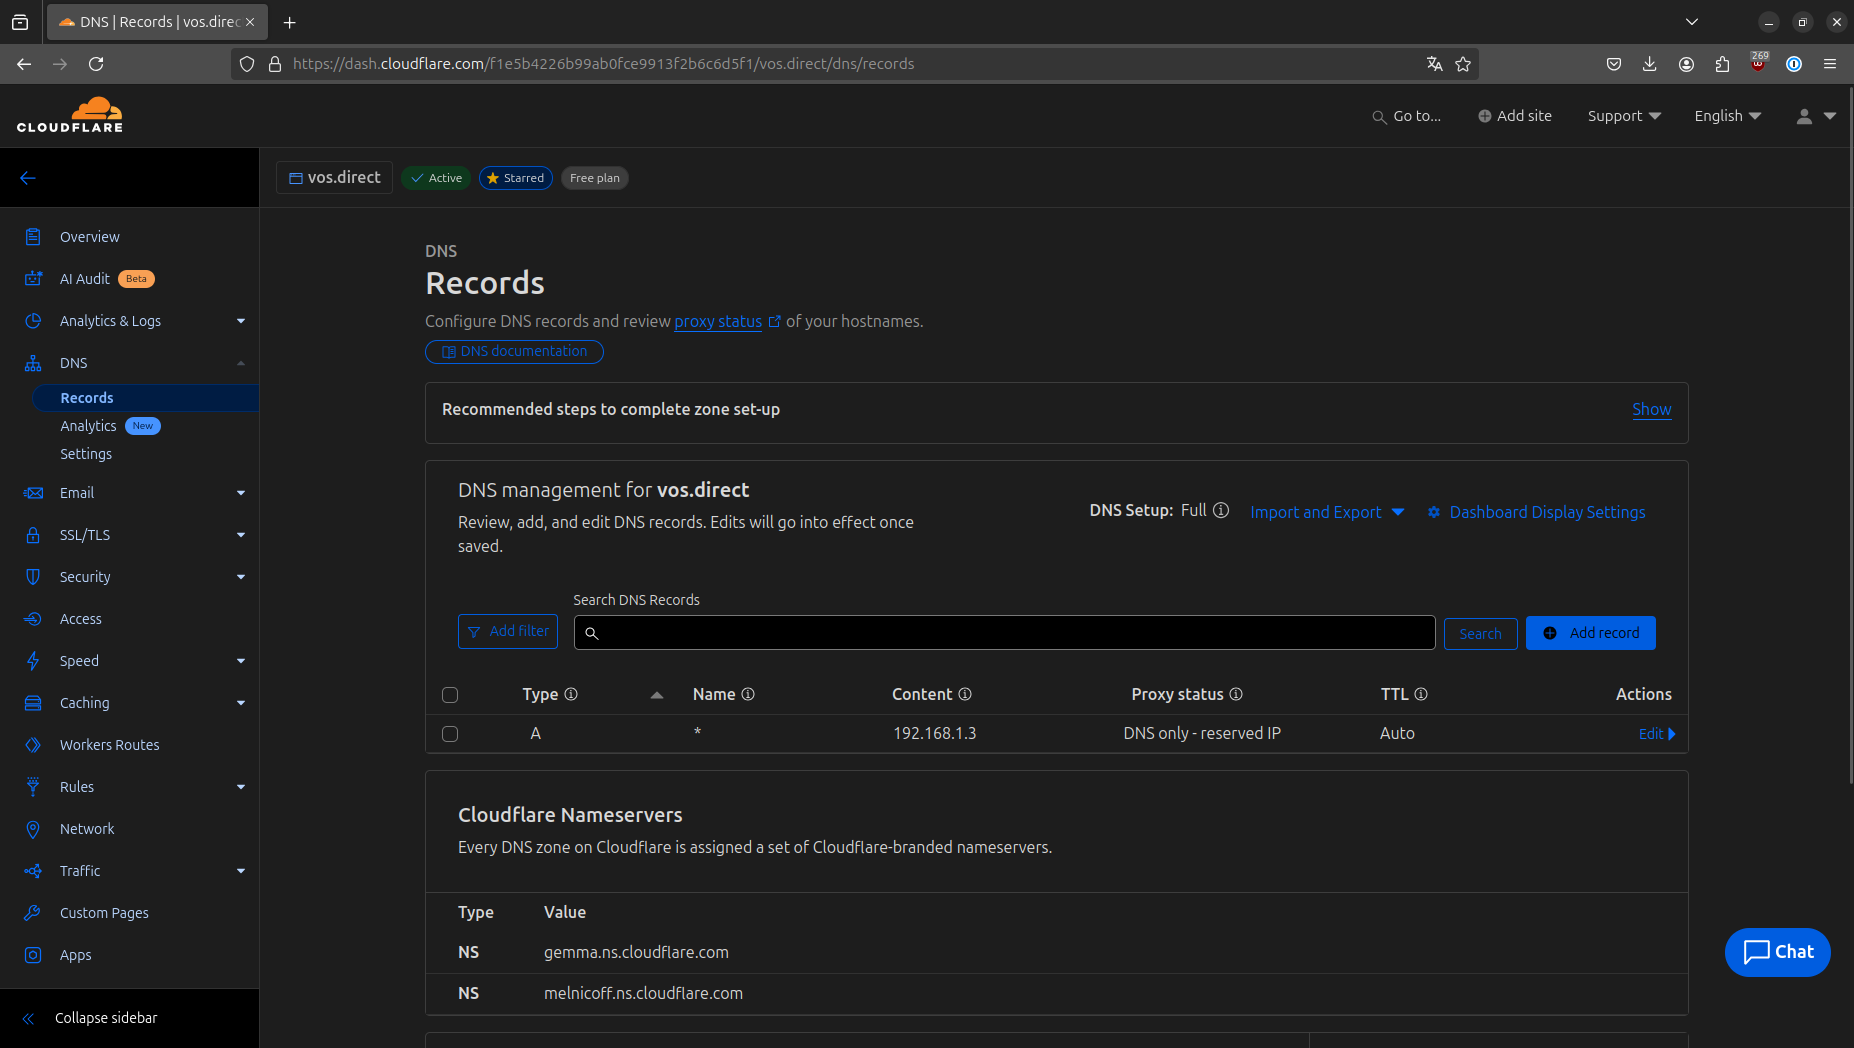
Adding a Wildcard DNS Record
While we're at it, let’s set up a wildcard DNS record for our domain that points to the local IP address of the device running Traefik. This ensures the DNS challenge works correctly and allows domain names to resolve to the correct IP address.
Since my Raspberry Pi is on 192.168.1.3, I created a wildcard record for *.vos.direct pointing to that IP.
Storing Cloudflare API Credentials Securely
To securely store the Cloudflare API token, start by creating a secrets directory:
mkdir -p secretsThen store the API key and email in the secrets directory:
echo -n "YOUR_API_KEY" > secrets/cf_api_key
echo -n "YOUR_EMAIL" > secrets/cf_api_email
To keep the secrets directory secure, set its permissions appropriately. Since I'm using the admin user, I run:
sudo chmod 0700 secrets
sudo chmod 0400 secrets/*
sudo chown admin:docker secrets
Creating the Docker-Compose File for Traefik
Here’s the docker-compose.yml file for Traefik:
secrets: #:: allows us to conveniently store and access sensitive data. Images are required to have the capability to use secrets. Hence, the image must be able to read data from files.
  cf_api_key:
    file: "./secrets/cf_api_key"
  cf_api_email:
    file: "./secrets/cf_api_email"

services:
  traefik:
    image: traefik:v3.2
    container_name: traefik
    restart: unless-stopped
    ports:
      - "80:80"
      - "443:443"
    volumes:
      - ./config/traefik.yml:/etc/traefik/traefik.yml
      - ./config/dynamic.yml:/etc/traefik/dynamic.yml
      - letsencrypt:/letsencrypt
    secrets:
      - cf_api_key
      - cf_api_email
    environment:
      - CF_API_EMAIL_FILE=/run/secrets/cf_api_email
      - CF_DNS_API_TOKEN_FILE=/run/secrets/cf_api_key #:: Notice the `_FILE` suffix. This is is specific to this image. Others may use a different suffix/prefix. Normally, you can find information about this in the image's documentation.
    networks:
      - traefik
      - internal
    depends_on:
      - docker-socket-proxy

  docker-socket-proxy:
    image: tecnativa/docker-socket-proxy
    container_name: docker-socket-proxy
    restart: unless-stopped
    environment:
      CONTAINERS: 1
      NETWORKS: 1
    volumes:
      - $XDG_RUNTIME_DIR/docker.sock:/var/run/docker.sock:ro #:: `$XDG_RUNTIME_DIR` is a variable that points to the user's runtime directory. This is because i run docker as a non-root user. If you run docker as root, you can replace this with `/var/run`.
    networks:
      - internal

volumes:
  letsencrypt: {}

networks:
  internal: {}
  traefik:
    external: true
IMPORTANT:
Make sure to update Traefik to the latest version. Check Traefik’s Docker Hub page for the latest version. Be aware that some things may have changed without me updating this guide.
NOTE:
If you're using a different DNS provider, you'll need to adjust the variables accordingly. Refer to the Traefik documentation for details.
To enhance security, we don't want to expose the Docker socket directly to the Traefik container. Instead, we use a docker-socket-proxy container to provide controlled access to the Docker socket.
Creating the Traefik Network
Since the traefik network isn't defined in the docker-compose file, we need to create it manually:
docker network create traefik
Configuring Traefik
Now, let’s create the config/traefik.yml file with the following content:
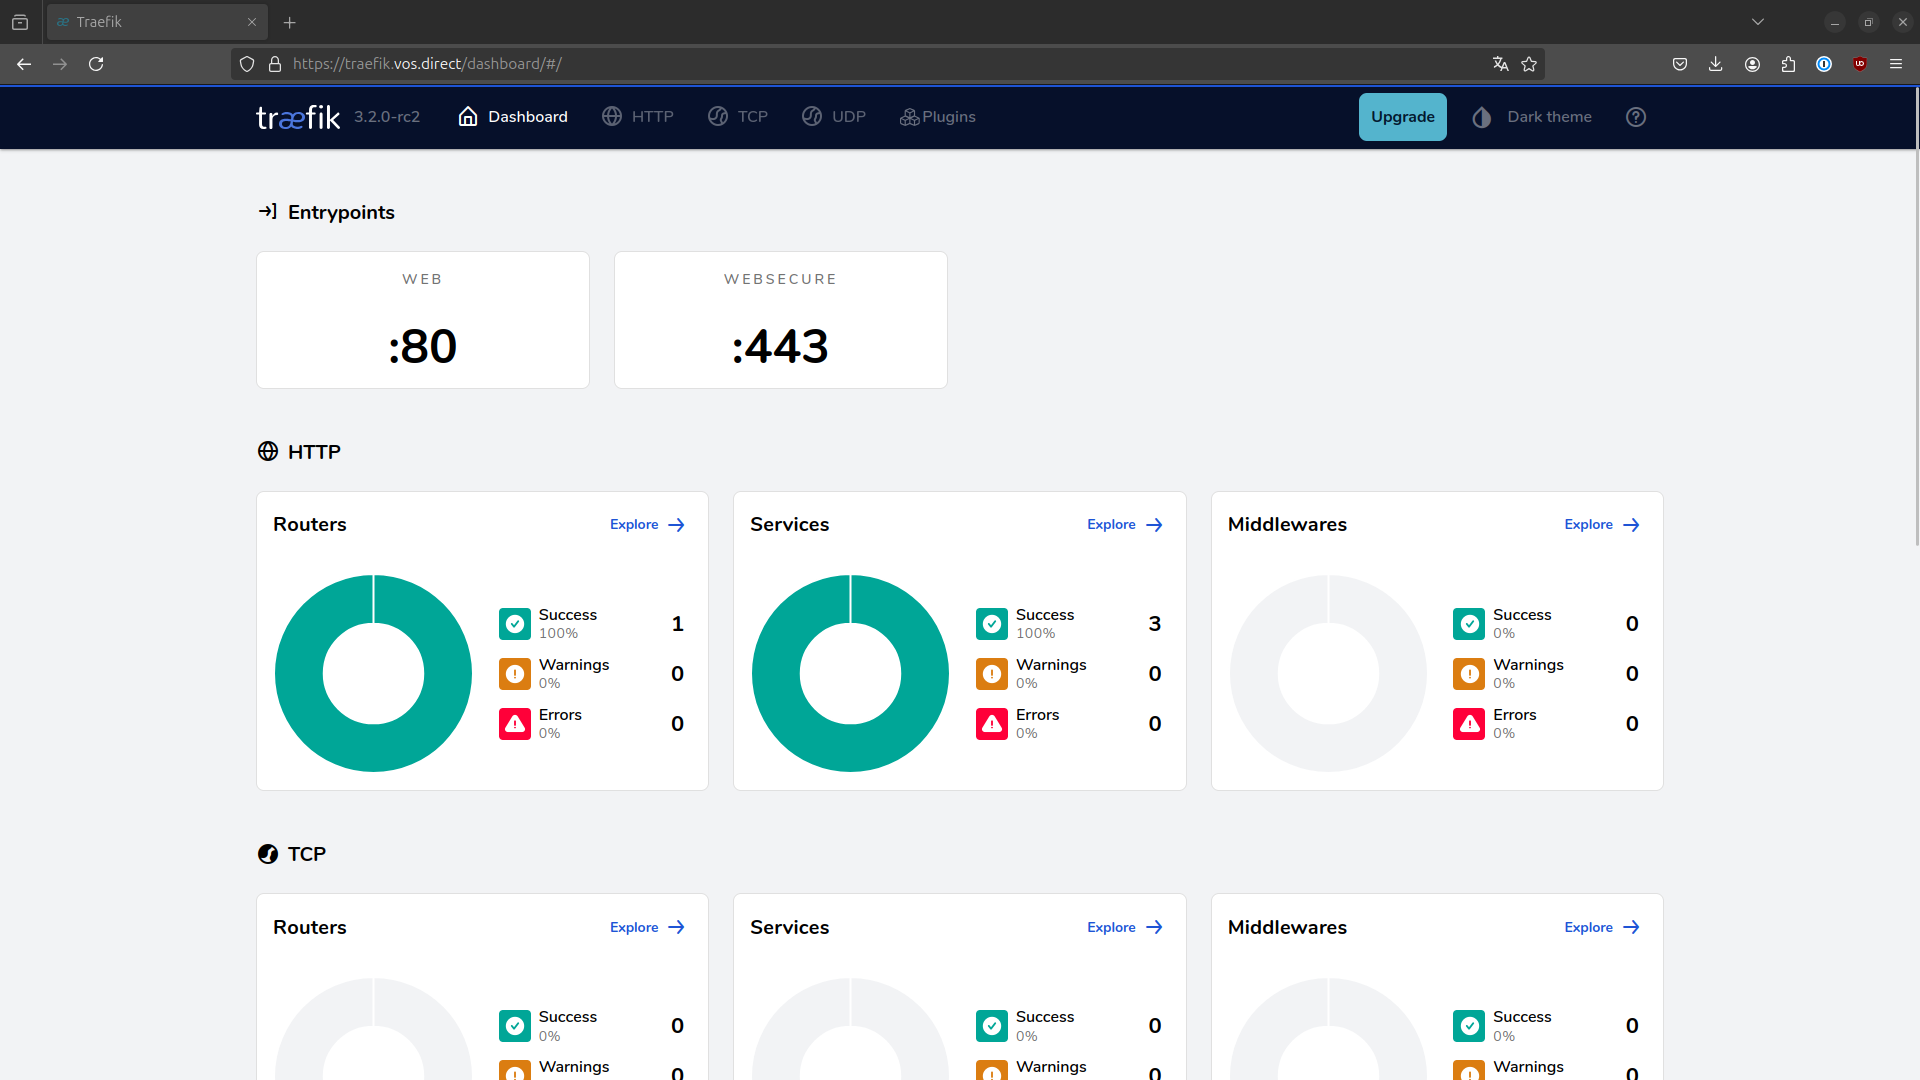
api:
  dashboard: true
  insecure: false

entryPoints:
  web:
    address: ":80"
    http:
      redirections:
        entryPoint:
          to: websecure
          scheme: https
  websecure:
    address: ":443"

log:
  level: DEBUG

providers:
  docker:
    endpoint: "tcp://docker-socket-proxy:2375"
    exposedByDefault: false
    watch: true
  file:
    filename: "/etc/traefik/dynamic.yml"
    watch: true

certificatesResolvers:
  letsencrypt:
    acme:
      email: your_webmaster@email.com
      storage: "/letsencrypt/acme.json"
      dnsChallenge:
        provider: cloudflare
        delayBeforeCheck: 10
NOTE:
If you're using a different DNS provider, change theproviderto the appropriate one. Check the Traefik documentation for the correct provider name.
This configuration enables the Traefik dashboard, sets up HTTP and HTTPS entry points, enables both the Docker and file providers, and configures a certificate resolver named letsencrypt that uses the ACME DNS challenge with Cloudflare.
I prefer a 10-second delay before checking the DNS challenge to ensure DNS records are updated in time, but you could set this to 0 if that works for you.
Creating the Dynamic Configuration File
Next, create the config/dynamic.yml file with this content:
http:
  serversTransports:
    https-proxy:
      insecureSkipVerify: true

  routers:
    traefik:
      rule: "Host(`traefik.vos.direct`)"
      service: api@internal
      entryPoints:
        - websecure
      tls:
        certResolver: letsencrypt
This is a basic configuration to make the Traefik dashboard accessible at traefik.vos.direct. I could have used labels in the docker-compose file, but using a dynamic configuration file like this is useful, especially when proxying services outside of Docker.
NOTE:
For proxying services indynamic.yml, add a service and configure a router similar to the one above.
Configuring Your DNS Resolver
If you’re using a firewall like OPNSense, ensure that your domain is set in the "Private Domains" section of the DNS resolver. This ensures local IP resolution for your domain. For OPNSense with Unbound DNS, go to Services -> Unbound DNS -> Advanced, and add your domain in the "Private Domains" section.
Starting Traefik
To start Traefik, run:
docker-compose up
If everything works, you should be able to access the Traefik dashboard at traefik.vos.direct. Once you've confirmed it’s working, start it in the background:
docker-compose up -d
TIP:
Setlog.leveltoINFOintraefik.ymlafter setup to reduce log output. The default level isERROR, butINFOgives a bit more insight without overwhelming you.
Support
All content on this blog is free and open to everyone—no paywalls, no exclusive sections. I believe knowledge should be shared, and I’m here to make tech accessible and enjoyable. If you found this post helpful or inspiring and want to help keep things running, consider supporting with a one-time donation. Every bit helps me keep creating and sharing!
Thank you for reading!